Requirement: Pick up files at scheduled time and send out an email at the end.
Implementation using: IBM Integration bus(IIB9)
Requirement analysis:
- IIB process should transfer the files at 11:00 PM everyday to a destination directory.
- A mail needs to be sent to a user with all the file names which are picked up on that particular day.
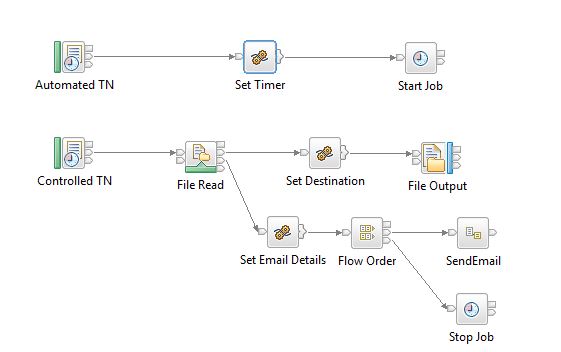
Below image shows complete message flow.
Configure the properties as shown in below images.
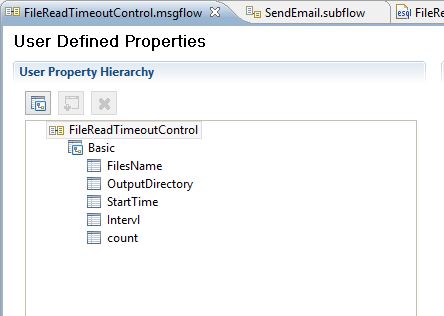
We need to configure these properties so that values can be changed at run-time. Once created, we need to declare them in the compute node to use in the code as shown below.
DECLARE OutputDirectory EXTERNAL CHARACTER ”;
DECLARE StartTime EXTERNAL CHARACTER ”;
DECLARE Intervl EXTERNAL CHARACTER ”;
DECLARE count EXTERNAL CHARACTER ”;
DECLARE FilesName SHARED CHARACTER ”;
Values for these properties will be set in baroverride file like,
au.com.LearnIIB.FileOperations.FileReadTimeoutControl#InputDirectory=C:\Users\nusa\IBM\InputDir
au.com.LearnIIB.FileOperations.FileReadTimeoutControl#OutputDirectory=C:\Users\nusa\IBM\OutputDir
au.com.LearnIIB.FileOperations.FileReadTimeoutControl#StartTime=23:00:00 —-Will be triggered at 11:00 PM daily.—-
au.com.LearnIIB.FileOperations.FileReadTimeoutControl#Intervl=30 —-After StartTime file gets picked up at every 30 seconds till flow moves to No Match in FileRead node—-
au.com.LearnIIB.FileOperations.FileReadTimeoutControl#count=-1
The first node is used to trigger the controlled node and to control the number of instances and intervals. Properties for which are shown below.

Here as we want to trigger the flow once in a day, we give time out interval value as 24*60*60 seconds. Once this node gets triggered, we set properties for the controlled node as shown below in the next compute node.
Set OutputLocalEnvironment.TimeoutRequest.Action =’SET’;
Set OutputLocalEnvironment.TimeoutRequest.Identifier =’ControlledTN’;
Set OutputLocalEnvironment.TimeoutRequest.StartDate = CURRENT_DATE;
Set OutputLocalEnvironment.TimeoutRequest.StartTime =CAST(StartTime AS TIME);
Set OutputLocalEnvironment.TimeoutRequest.Interval = CAST(Intervl AS INTEGER);
Set OutputLocalEnvironment.TimeoutRequest.Count=CAST(count as INTEGER);
Set OutputLocalEnvironment.TimeoutRequest.IgnoreMissed=FALSE;
Once values are set for the controlled node, we use timeout control node which will have unique identifier same as controlled timeout notification node as shown below.

Below image shows the properties we need to set for the Timeout notification node which we are trying to control and schedule here.

Now if everything is right, this node gets triggered at the set time and flow picks up the files and moves to next compute node where we set output file properties.
SET OutputLocalEnvironment.Destination.File.Directory = OutputDirectory;
SET FilesName = InputLocalEnvironment.File.Read.Name;
SET OutputLocalEnvironment.Destination.File.Name = InputLocalEnvironment.File.Read.Name;
PROPAGATE TO TERMINAL ‘out’ DELETE NONE;
Once all the files are picked up, flow moves to No Match node and then to set email properties. Here we need to cancel the timeout notification so that again an instance won’t get created.
SET OutputLocalEnvironment.Variables.sendEmails.emailDetails.mailSuccess.bodyContentType = ‘text/html’;
SET OutputLocalEnvironment.Variables.sendEmails.emailDetails.mailSuccess.to = ‘ToAddress’;
SET OutputLocalEnvironment.Variables.sendEmails.emailDetails.mailSuccess.cc = ‘CCAddress’;
SET OutputLocalEnvironment.Variables.sendEmails.emailDetails.mailSuccess.from = ‘FromAddress’;
SET OutputLocalEnvironment.Variables.sendEmails.emailDetails.mailSuccess.subject = ‘Files transfer was successfull’;
SET OutputLocalEnvironment.Variables.sendEmails.emailDetails.mailSuccess.body = ‘Following files are being transferred successfully<br/>’ || FilesName;
Set OutputLocalEnvironment.TimeoutRequest.Action =’CANCEL’;
Set OutputLocalEnvironment.TimeoutRequest.Identifier =’ControlledTN’;
Now we use Timeout control node which will have unique identifier same as of controlled timeout notification node to cancel the scheduled job.

Here use flow order node to send email and then to cancel the job.
Hope this post contains required details.
Cheers,
Santhosh Yadav N U
