Configuration for Email Input Node

Run the following commands at the broker node level and you should be ready to read the emails from the mailbox.

  1. Import root certificates of the mailbox provider
keytool -import -trustcacerts -file certificatePath.cer -keystore truststoreFile -alias certalias

2. Configure HTTPSConnector object to read keystore and truststore

mqsichangeproperties BrokerNode -b httplistener -o HTTPSConnector -n keystoreFile -v keyStorePath
mqsichangeproperties BrokerNode -b httplistener -o HTTPSConnector -n truststoreFile -v trustStorePath
mqsichangeproperties BrokerNode -b httplistener -o HTTPSConnector -n keystorePass -v keyStorePassword
mqsichangeproperties BrokerNode -b httplistener -o HTTPSConnector -n truststorePass -v TrustStorePassword
mqsichangeproperties BrokerNode -b httplistener -o HTTPSConnector -n enableSSLConnector -v true
mqsireportproperties BrokerNode -b httplistener -o HTTPSConnector -a

3. Create security identity and email configuration objects

mqsisetdbparms BrokerNode -n email::securityIdentityObjectName -u mailboxUserid -p mailboxPassword
mqsicreateconfigurableservice BrokerNode -c EmailServer -o emailConfigServiceName -n serverName,securityIdentity -v pop3://test.email.server.ibm.com:12345,securityIdentityObjectName

IBM IIB – Self-signed certificate

Below are the commands to create a self-signed certificate using keytool commands and using the same in the broker. The certificate created here should be shared with service consumers in order to secure the services hosted in the broker. Before running the commands, read about keystores, self-signed certificates, the difference between keystore and truststore and basics of SSL.

Create keystore and self-signed certificate
keytool -genkey -keyalg RSA -alias selfsigned -keystore “C:\IBM\MQSI\8.0.0.4\jre16\lib\security\BrokerName\Keystore.jks” -storepass password -validity 360 -keysize 2048

After executing the above command, provide required details for the certificate and keystore.

Export trust certificate from the keystore.

keytool -export -alias selfsigned -keystore “C:\IBM\MQSI\8.0.0.4\jre16\lib\security\BrokerName\Keystore.jks” -file “C:\IBM\MQSI\8.0.0.4\jre16\lib\security\BrokerName\selfsigned.arm”


Create truststore and import trust certificate

keytool -import -alias selfsigned -file “C:\IBM\MQSI\8.0.0.4\jre16\lib\security\BrokerName\selfsigned.arm” -keystore “C:\IBM\MQSI\8.0.0.4\jre16\lib\security\BrokerName\truststore.jks” -storepass password


Export key from the certificate for consumer
keytool -importkeystore -srckeystore “C:\IBM\MQSI\8.0.0.4\jre16\lib\security\BrokerName\Keystore.jks” -destkeystore “C:\IBM\MQSI\8.0.0.4\jre16\lib\security\BrokerName\key.jks” -deststoretype jks

Now we have Keystore, Truststore, trust certificate(Goes into truststore) and certificate with key.

Execute the below commands to make broker use the certificate for all https connections.

mqsichangeproperties brokerName -b httplistener -o HTTPListener -n enableSSLConnector -v true

Note: Change https port only if required.
mqsichangeproperties brokerName -b httplistener -o HTTPSConnector -n port -v 7085
mqsichangeproperties brokerName -b httplistener -o HTTPSConnector -n clientAuth -v true
mqsichangeproperties brokerName -e EGName -o ExecutionGroup -n soapNodesUseEmbeddedListener -v false
mqsichangeproperties brokerName -e EGName -o ExecutionGroup -n httpNodesUseEmbeddedListener -v false
mqsichangeproperties brokerName -b httplistener -o HTTPSConnector -n keystoreFile -v “C:\IBM\MQSI\8.0.0.4\jre16\lib\security\BrokerName\Keystore.jks”
mqsichangeproperties brokerName -b httplistener -o HTTPSConnector -n truststoreFile -v “C:\IBM\MQSI\8.0.0.4\jre16\lib\security\BrokerName\truststore.jks”
mqsichangeproperties brokerName -b httplistener -o HTTPSConnector -n keystorePass -v password
mqsichangeproperties brokerName -b httplistener -o HTTPSConnector -n truststorePass -v password
mqsichangeproperties brokerName -b httplistener -o HTTPSConnector -n keyAlias -v selfsigned
mqsichangeproperties brokerName -b httplistener -o HTTPSConnector -n keypass -v password

Note: Need to restart the broker for changes to work
mqsistop brokerName
mqsistart brokerName

Note: Execute the below command to view the properties set in the commands.
mqsireportproperties brokerName -b httplistener -o HTTPSConnector  -a


Error in starting the Broker (IIB)

Here is a quick solution to the problem faced while starting an IIB Message Broker.

Error:

C:\IBM\MQSI\8.0.0.4>mqsistart MyBroker

BIP8015E: The component cannot be started.

The command cannot start the required component.

The possible causes of this error are: insufficient user ID permissions; lack of system resources (not enough memory); the WebSphere MQ environment is not configured correctly for the user who is running the command (for example, the mqm library is missing from the user’s path).

Cause:

Yet to figure out(Will add soon).

Solution:

  1. Create a local user

Open Administrative Tools -> Computer Management -> Local Users and Groups.

Right click on Users -> New User, enter details and click create.

Creating user1

  1. Add the user to mqm and administrator groups.

Right click on the newly created user -> Properties -> MemberOf -> Add -> Advanced

Adding to group2

Click on the Find Now button and select the groups.

  1. Tell broker service to use this newly created user for starting.

Open Task Manager -> Services -> Services (Button with Admin symbol)

Broker Properties3

Right click on the IBM WebSphere Message Broker service and select properties.

In the Logon tab, select ‘This Account’ and Browse to select the created user.

Once you get the below window, click on Advanced and click Find Now to see the list of users in the system as shown in the below screenshots.

Selecting groups4

Selecting groups5

Select the newly created user and enter the password.

Selecting user6

Done. Good to start the broker with the new user.


Job Scheduling in IIB9 using Timeout nodes(Files)

Requirement: Pick up files at scheduled time and send out an email at the end.

Implementation using: IBM Integration bus(IIB9)

Requirement analysis:

  1. IIB process should transfer the files at 11:00 PM everyday to a destination directory.
  2. A mail needs to be sent to a user with all the file names which are picked up on that particular day.

Below image shows complete message flow.

Complete Message Flow

Configure the properties as shown in below images.

User Defined Properties

We need to configure these properties so that values can be changed at run-time. Once created, we need to declare them in the compute node to use in the code as shown below.

DECLARE OutputDirectory EXTERNAL CHARACTER ”;
DECLARE StartTime EXTERNAL CHARACTER ”;
DECLARE Intervl EXTERNAL CHARACTER ”;
DECLARE count EXTERNAL CHARACTER ”;
DECLARE FilesName SHARED CHARACTER ”;

Values for these properties will be set in baroverride file like,

au.com.LearnIIB.FileOperations.FileReadTimeoutControl#InputDirectory=C:\Users\nusa\IBM\InputDir
au.com.LearnIIB.FileOperations.FileReadTimeoutControl#OutputDirectory=C:\Users\nusa\IBM\OutputDir
au.com.LearnIIB.FileOperations.FileReadTimeoutControl#StartTime=23:00:00 —-Will be triggered at 11:00 PM daily.—-
au.com.LearnIIB.FileOperations.FileReadTimeoutControl#Intervl=30 —-After StartTime file gets picked up at every 30 seconds till flow moves to No Match in FileRead node—-
au.com.LearnIIB.FileOperations.FileReadTimeoutControl#count=-1

The first node is used to trigger the controlled node and to control the number of instances and intervals. Properties for which are shown below.

Automated Timeout Notification Properties

Here as we want to trigger the flow once in a day, we give time out interval value as 24*60*60 seconds. Once this node gets triggered, we set properties for the controlled node as shown below in the next compute node.

Set OutputLocalEnvironment.TimeoutRequest.Action =’SET’;
Set OutputLocalEnvironment.TimeoutRequest.Identifier =’ControlledTN’;
Set OutputLocalEnvironment.TimeoutRequest.StartDate = CURRENT_DATE;
Set OutputLocalEnvironment.TimeoutRequest.StartTime =CAST(StartTime AS TIME);
Set OutputLocalEnvironment.TimeoutRequest.Interval = CAST(Intervl AS INTEGER);
Set OutputLocalEnvironment.TimeoutRequest.Count=CAST(count as INTEGER);
Set OutputLocalEnvironment.TimeoutRequest.IgnoreMissed=FALSE;

Once values are set for the controlled node, we use timeout control node which will have unique identifier same as controlled timeout notification node as shown below.

Start Job Properties

Below image shows the properties we need to set for the Timeout notification node which we are trying to control and schedule here.

Controlled Timeout Notification Properties

Now if everything is right, this node gets triggered at the set time and flow picks up the files and moves to next compute node where we set output file properties.

SET OutputLocalEnvironment.Destination.File.Directory = OutputDirectory;
SET FilesName = InputLocalEnvironment.File.Read.Name;
SET OutputLocalEnvironment.Destination.File.Name = InputLocalEnvironment.File.Read.Name;
PROPAGATE TO TERMINAL ‘out’ DELETE NONE;

Once all the files are picked up, flow moves to No Match node and then to set email properties. Here we need to cancel the timeout notification so that again an instance won’t get created.

SET OutputLocalEnvironment.Variables.sendEmails.emailDetails.mailSuccess.bodyContentType = ‘text/html’;
SET OutputLocalEnvironment.Variables.sendEmails.emailDetails.mailSuccess.to = ‘ToAddress’;
SET OutputLocalEnvironment.Variables.sendEmails.emailDetails.mailSuccess.cc = ‘CCAddress’;
SET OutputLocalEnvironment.Variables.sendEmails.emailDetails.mailSuccess.from = ‘FromAddress’;
SET OutputLocalEnvironment.Variables.sendEmails.emailDetails.mailSuccess.subject = ‘Files transfer was successfull’;
SET OutputLocalEnvironment.Variables.sendEmails.emailDetails.mailSuccess.body = ‘Following files are being transferred successfully<br/>’ || FilesName;

Set OutputLocalEnvironment.TimeoutRequest.Action =’CANCEL’;
Set OutputLocalEnvironment.TimeoutRequest.Identifier =’ControlledTN’;

Now we use Timeout control node which will have unique identifier same as of controlled timeout notification node to cancel the scheduled job.

Stop Job Properties
Stop Job Properties

Here use flow order node to send email and then to cancel the job.

Hope this post contains required details.

Cheers,

Santhosh Yadav N U

DOJO Multiselect control for IBM BPM

What is multiselect?

MultiSelect

Control with ability to select multiple items. In IBM BPM we have option to make a dropdown as multiselect but it does not look good as we will have rows of values with checkbox.

With multiselect control, it is easy to select the values and also widget looks good with scrolling option if values are more.

So below are few steps to create a custom multiselect control in IBM BPM.

Step 1: Create a coach view and name it as multiselect. Drag an vertical section to layout area and create an output text for label and a custom HTML control as shown below.

MultiSelectLayout

Step 2: Create a variable to map the selected values as ‘Business Data’.

Step 3: Create a configuration option to map ajax service to get the values dynamically as shown below.

MultiSelectVariables

Step 4: In the custom HTML space paste the below code, where dom node with id ‘multiselect’ will have the multiselect control.

<select id=”multiselect”></select>
<style>
#dynamic{
height: 130px;
width: 180px;
}
</style>

here specifying height and the width is important.

Step 5: Create required AMD dependencies as shown below.

MultiSelectAMDDependencies

Step 6: Write the below code in ‘load’ event handler.

//Input for Ajax service. Here we don’t need it.
var inputText = {text: “Dummy”};
//Get the URL to call the ajax
var ajaxUrl = this.context.options.dataService.url;
var customers = [];
var _self = this;
//Prepare AJAX call
var xhrArgs = {
//Set the URL
url: ajaxUrl,
content: JSON.stringify(inputText),
//Specify the result type expected
handleAs: “json”,
//Headers are required when we run this in Mozilla or IE. Could not find why.
headers: {
“Content-Type”: “application/json”,
“Accept”: “application/json”,
},
load: function(response) {
//Copy the result to an object
customers = response.data.data.results.items;
//Get the dom using the id
var sel = dom.byId(‘multiselect’);
var n = 0;
//Loop for values and append it to the node inner HTML
for(var i=0;i<customers.length;i++){
//Creating element of type option as needed by any select controls
var c = win.doc.createElement(‘option’);
c.innerHTML = customers[i];
c.value = n++;
sel.appendChild(c);
}
//Creating an object of type DOJO Multiselect and adding values present in ‘sel’
var myMultiSelect = new MultiSelect({ name: ‘dynamic’ }, sel);
var submitButton = dojo.query(“.submitBtn”)[0];
//To get the selected values on click of some button
var myObject = {
id: “myObject”,
onClick: function(evt){
var selected = [];
selectedCustomers = [];
selected = myMultiSelect.get(‘value’);
//Get all the selected values and bind it to the object
for(var i=0;i<selected.length;i++){
selectedCustomers[i] = customers[selected[i]];
}
selectedCustomersString = selectedCustomers.toString();
_self.context.binding.set(“value”, selectedCustomersString);
},
};
//On click of the button, call onClick funtion to get the values to object binded.
dojo.connect(submitButton, “onclick”, myObject.onClick);
},
error: function(e) {
console.log(“service call failed: ” + ajaxUrl + e );
}
}
//Call the Ajax
xhr.post(xhrArgs);

Done. ! 🙂 Drag this coach view just like an UI element in the coach or other coach view to use.

DOJO Stand By for IBM BPM Coach

Problem: Fact is IBM BPM UI’s are slower than NON-BPM UI. And in IBM BPM 8.* versions, users won’t know that there is some background process running unless they see a small icon in top-right corner of the screen. This becomes a problem if user keeps clicking buttons when service is middle of something.

Solution: To avoid this problem, we have a option in DOJO which helps us blocking the user from doing anything in UI when something is running in the background. And that is ‘StandBy‘.

How to implement the same in IBM BPM?

Simple 😉 Already available here

Create a coach view and name it ‘Stand By’.

On the tab behavior add AMD dependency:

module id: dojox/widget/Standby

alias: STB

Put this below code in ‘Load’ event handler. And place the coach view in which ever the coach you wish to have this functionality.

Script on Load
Script on Load

And there you go, your BPM UI looks so cool when ‘Loading’ icon shows up 🙂

Custom Visibility Rule for Coach/Coach View

Quick Note on Visibility Rule: In IBM BPM 8.*, we have many ways to set the visibility for an UI element. But there comes some scenarios where visibility of an element depends on more than one element and in few other scenarios, OOB features won’t help.

In Such cases, we can create a custom coach view which will analyze ‘n’ number of data and gives the result which we can use for setting visibility.

A simple Visibility rule configuration options looks like:

Simple Visibility Rule

Here we can use only one value on which visibility depends.

Eg: When variable1 is equals to “something”, then set visibility1 to “Hidden”.

This is a great and simple option when we are checking for single variable. What to do when we have more than 1 variable, which defines the visibility of an UI element?

Solution is to create a customized Visibility rule using Coach View which is very simple and can be used to analyze multiple data.

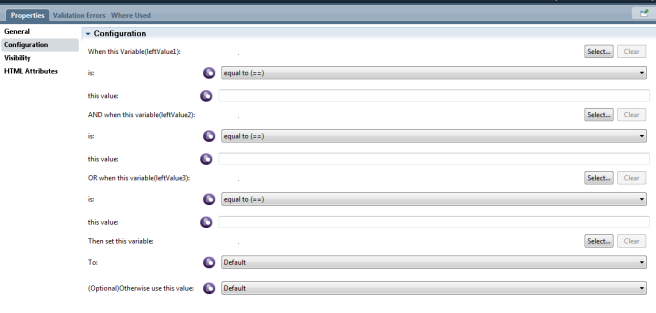
Below is a solution when we want to use 3 variables and in both AND and OR condition.

Step 1: Create the variable as shown in below diagram.

Variables Needed

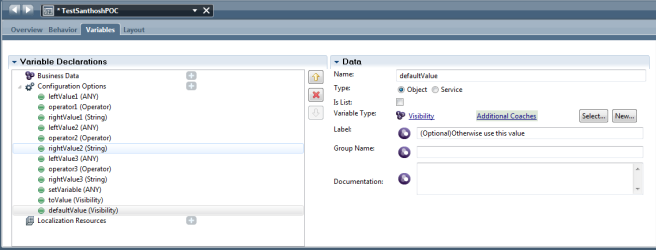
Lable for each variable(Helps when using as it is more descriptive):

leftValue1: When this Variable(leftValue1)

operator1: is

rightValue1 : this value

leftValue2 : AND when this variable(leftValue2)

operator2 : is

rightValue2 : this value

leftValue3 : OR when this variable(leftValue3)

operator3 : is

rightValue3 : this value

setVariable : Then set this variable

toValue : To

defaultValue : (Optional)Otherwise use this value

Left values are used to map the variables which needs to validated.

Right values are used to assign values to compare.

Operators helps in doing comparisons.

ToValue and default value are the actual visibility values(Like none, hidden, editable)

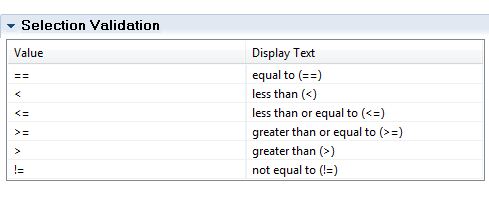
Create BO for Operator as shown below:

Operator

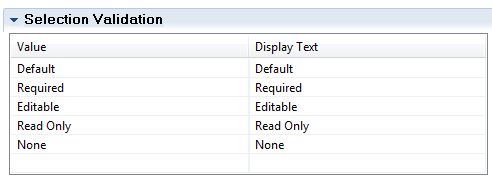
Create BO for Visibility as shown below:

Visibility

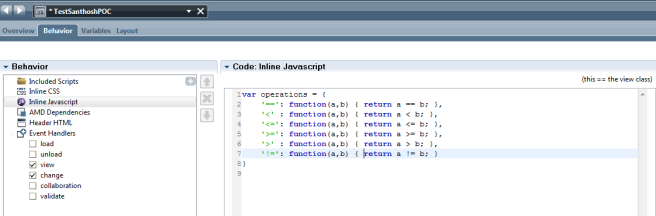
Step2: Write a function to define operations for each operator in the inline JS of the CV.

Inline Function

Step 3: In the View event handler, write the below script.

//Getting the values from variables declared as configuration options to local variables.

var options = this.context.options,
leftValue1 = options.leftValue1.get(“value”),
leftValue2 = options.leftValue2.get(“value”),
leftValue3 = options.leftValue3.get(“value”),
operator1 = options.operator1.get(“value”),
operator2 = options.operator2.get(“value”),
operator3 = options.operator3.get(“value”),
rightValue1 = options.rightValue1.get(“value”),
rightValue2 = options.rightValue2.get(“value”),
rightValue3 = options.rightValue3.get(“value”),

setVariable = options.setVariable.get(“value”),
toValue = options.toValue.get(“value”),
defaultValue = options.defaultValue.get(“value”)
//Evaluating the values for each variables
if(typeof leftValue1 != “string”) {
rightValue1 = eval(rightValue1)
}

//The eval() function evaluates or executes an argument.
if(typeof leftValue2 != “string”) {
rightValue2 = eval(rightValue2)
}
if(typeof leftValue3 != “string”) {
rightValue3 = eval(rightValue3)
}
//Calling the function operations to do the operation on values.

//Depending on the return value, visibility is set from setVariable variable.
if((operations[operator1](leftValue1, rightValue1) && operations[operator2](leftValue2, rightValue2)) || operations[operator3](leftValue3, rightValue3)) {
if(setVariable != toValue) {
options.setVariable.set(“value”, toValue)
}

//If operations returns to false, default visibility value is set.
} else {
if(defaultValue && setVariable != defaultValue) {
options.setVariable.set(“value”, defaultValue)
}
}

Step 4: Write the below script in Change event handler to prevent this control from receiving its own change notifications.

if(event.property==’setVariable’)
return
else
this.view()

Once created and mapped, this is how the configuration for this coach view/visibility rule looks like:

Configuration Options

So using this same approach, we can create the visibility rule for multiple variables. Hope this detailed explanation helps.

Any doubts?? Mail me @santhoshyadavnu@gmail.com